
Purchasing from the US is becoming more common these days especially since many sites offer Free Shipping withing the US or have prices that can't be matched by Canadian stores. If you're in Vancouver, it is quite easy to purchase items from the US.
There are several postal outlets located at Point Roberts, but the one I use is called The Letter Carrier
You simply use the address of The Letter Carrier as the shipping address in your purchase.
(YOUR NAME)
(YOUR PHONE NUMBER)
145 Tyee Drive
Point Roberts, Wa 98281
Remember to include your name. phone number and e-mail address in the shipping address.
Once the postal outlet receives the package, they will contact you and you then simply need to drive over the border to Point Roberts and pick up your stuff. Once there, they will charge you a small pickup fee per package - the lowest being $3.00.
View Larger Map
** Remember to bring your receipts and documents with tracking numbers if possible.
Monday, April 19, 2010
Installing Hotspot Shield - NOD32 Fix
This fix should work if you're getting Nod32 threat popups and error messages when downloading or running the new versions of Hotspot Shield. I'm using Nod32 version 2.7 with Hotspot Shield version 1.41, but the steps below should work for most versions of Nod32.
*Click images to enlarge
1) Open services.msc from your start menu
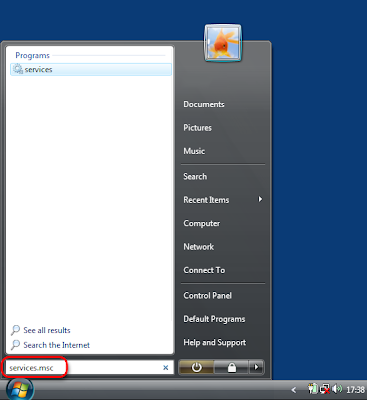
2) Scroll down until you find 'Nod32 Kernel Services'. Open it and under 'Startup Type' - Select 'Disable'. Press 'Apply'. At the Notification Area on your taskbar (bottom right of your screen), open Nod32 and Quit the program.
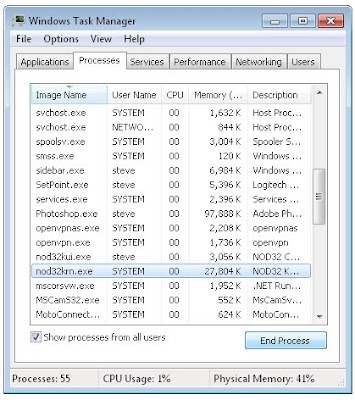
3) Now open the Task Manager - Right Click your taskbar > Start Task Manager. Under the 'Processes' tab, find 'nod32krn.exe' and click 'End Process'.
4) Download and Install Hotspot Shield. Run it to make sure it works. Try Hulu.com. Remember to Disconnect from the server when you are done!!

** You can easily Bookmark the Hotspot Shield Connect/Disconnect site instead of using the separate Hotspot shield program. If you do so, remember again to Disconnect when you're done since the Hotspot shield icon will not appear in the Notification Area of your taskbar.
5) If everything is working, you will have to start and enable Nod32 again. Open 'services.msc' > Find 'Nod32 Kernel Services' and change the 'Startup Type' to Automatic. Where it says 'Services Status', press 'Start'.
6) Start the Nod32 program by opening your Start Menu > Eset > Nod32 Control Panel.
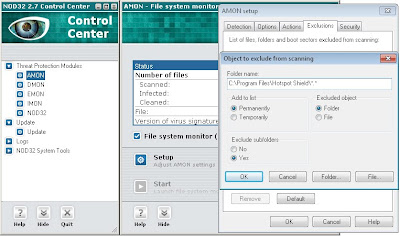
7) Now open Nod32. Find 'AMON' > Click 'Setup' > Find the 'Exclusions' tab > Click 'Add' > Add this in the 'Folder Name' space > C:\Program Files\Hotspot Shield\*.*
Remember the *.*
Also add this next location to your exclusions list, but this time choose the 'File' bubble > C:\PROGRAM FILES\HOTSPOT SHIELD\BIN\OPENVPNAS.EXE
Lastly, go to IMON > Setup > 'Miscellaneous' tab > Find the 'Exclusion' section and click 'Edit...' > 'Add' find the same 'openvpnas.exe' file as shown above.
All this does is tell Nod32 to exclude the Hotspot Shield folder & files from scanning.
If you get errors for other Hotspot Shield files, just add them to the same IMON and AMON exclusions list.
Done!
You might get error messages from Nod32 if you try to move/delete the Hotspot Shield install file after you enable Nod32, so make sure you move/delete before enabling Nod32 again.
*Click images to enlarge
1) Open services.msc from your start menu

2) Scroll down until you find 'Nod32 Kernel Services'. Open it and under 'Startup Type' - Select 'Disable'. Press 'Apply'. At the Notification Area on your taskbar (bottom right of your screen), open Nod32 and Quit the program.
3) Now open the Task Manager - Right Click your taskbar > Start Task Manager. Under the 'Processes' tab, find 'nod32krn.exe' and click 'End Process'.

4) Download and Install Hotspot Shield. Run it to make sure it works. Try Hulu.com. Remember to Disconnect from the server when you are done!!

** You can easily Bookmark the Hotspot Shield Connect/Disconnect site instead of using the separate Hotspot shield program. If you do so, remember again to Disconnect when you're done since the Hotspot shield icon will not appear in the Notification Area of your taskbar.
5) If everything is working, you will have to start and enable Nod32 again. Open 'services.msc' > Find 'Nod32 Kernel Services' and change the 'Startup Type' to Automatic. Where it says 'Services Status', press 'Start'.
6) Start the Nod32 program by opening your Start Menu > Eset > Nod32 Control Panel.
7) Now open Nod32. Find 'AMON' > Click 'Setup' > Find the 'Exclusions' tab > Click 'Add' > Add this in the 'Folder Name' space > C:\Program Files\Hotspot Shield\*.*
Remember the *.*
Also add this next location to your exclusions list, but this time choose the 'File' bubble > C:\PROGRAM FILES\HOTSPOT SHIELD\BIN\OPENVPNAS.EXE
Lastly, go to IMON > Setup > 'Miscellaneous' tab > Find the 'Exclusion' section and click 'Edit...' > 'Add' find the same 'openvpnas.exe' file as shown above.
All this does is tell Nod32 to exclude the Hotspot Shield folder & files from scanning.
If you get errors for other Hotspot Shield files, just add them to the same IMON and AMON exclusions list.

Done!
You might get error messages from Nod32 if you try to move/delete the Hotspot Shield install file after you enable Nod32, so make sure you move/delete before enabling Nod32 again.
Sunday, April 18, 2010
Using your DSLR Camera - Taking a Picture
Review the basic concepts here at Using your DSLR - Lesson 1
This post will be set in AV mode with a manually set center-focus point.
Now that you have seen several pictures that demonstrate effects such as depth of field and bokeh, it's time to take a more hands-on approach and begin taking your own pictures.
We'll start by learning how to compose your picture.
A picture normally takes shape when you spot something catches your attention. We'll call this 'thing' the subject. Once you have chosen your subject, it's time for some camera action.
You may eventually develop your own methods of picture taking, but here are the steps that I follow when I take a picture:
1) Frame > 2) Focus > 3) Re-frame > 4) Shoot
Before we begin with step one, you should manually choose your camera's focus point. You're smarter than the camera so you want to have as much control as possible when it comes to choosing what to focus.
(If you don't know how to do this, you'll have to read your camera's manual). When your focus point is chosen, the point should light up red in your viewfinder like the one seen below (no focus point is chosen in this picture).
 Remember to have your focus point or points figured out in advance or else the opportunity to take the picture might disappear. I will stick to a center focus point in this post.
Now back to your subject. Once you have chosen the subject, you will have to 1) Frame the image. Through your viewfinder, decide what other elements you want to have in your image. Remember the depth of field and bokeh effects you can achieve by adjusting the aperture and shutter speed.
Now it's time to 2) Focus on your subject. You will have to move your camera so the center focus point is targeted at the subject. Press the shutter button half way down until you hear a beep. This means that the camera has locked onto and is focused on what you have chosen. If it doesn't beep, you are either too close to the subject; there's not enough light for the camera or the camera is just having troubles locking onto the subject.
You can take the picture with the subject dead center in your shot, and in this case you'll be skipping the 3) Re-frame step. It's difficult to re-frame subjects that are moving, but in the case of static objects, you can be creative and thus use the 3) Re-frame step. It's pretty simple to achieve a shot like the one below. Try to think about it yourself before you read on.

You probably figured it out, but here's how it's done. Once you have 1) Framed the image in your mind and through the viewfinder and 2 ) Focused the subject by pressing and holding the shutter button half way down, you now have to 3) Re-frame the image. With the shutter button still held down, move the camera in any direction and in the case above - to the left - and 4) Shoot - press the shutter button all the way down. Finished!
For subjects that you have difficulty focusing, especially ones that move, you can set your camera's focus point to Auto. Setting the AF mode to AI SERVO can also help. An explanation of AI Servo can be found here.
It's time to take your own pictures. Remember the concepts discussed in Lesson 1. Experiment with your camera and use it all the time and you'll figure everything out in no time.
This post will be set in AV mode with a manually set center-focus point.
Now that you have seen several pictures that demonstrate effects such as depth of field and bokeh, it's time to take a more hands-on approach and begin taking your own pictures.
We'll start by learning how to compose your picture.
A picture normally takes shape when you spot something catches your attention. We'll call this 'thing' the subject. Once you have chosen your subject, it's time for some camera action.
You may eventually develop your own methods of picture taking, but here are the steps that I follow when I take a picture:
1) Frame > 2) Focus > 3) Re-frame > 4) Shoot
Before we begin with step one, you should manually choose your camera's focus point. You're smarter than the camera so you want to have as much control as possible when it comes to choosing what to focus.
(If you don't know how to do this, you'll have to read your camera's manual). When your focus point is chosen, the point should light up red in your viewfinder like the one seen below (no focus point is chosen in this picture).
Remember to have your focus point or points figured out in advance or else the opportunity to take the picture might disappear. I will stick to a center focus point in this post.Now back to your subject. Once you have chosen the subject, you will have to 1) Frame the image. Through your viewfinder, decide what other elements you want to have in your image. Remember the depth of field and bokeh effects you can achieve by adjusting the aperture and shutter speed.
Now it's time to 2) Focus on your subject. You will have to move your camera so the center focus point is targeted at the subject. Press the shutter button half way down until you hear a beep. This means that the camera has locked onto and is focused on what you have chosen. If it doesn't beep, you are either too close to the subject; there's not enough light for the camera or the camera is just having troubles locking onto the subject.
You can take the picture with the subject dead center in your shot, and in this case you'll be skipping the 3) Re-frame step. It's difficult to re-frame subjects that are moving, but in the case of static objects, you can be creative and thus use the 3) Re-frame step. It's pretty simple to achieve a shot like the one below. Try to think about it yourself before you read on.
You probably figured it out, but here's how it's done. Once you have 1) Framed the image in your mind and through the viewfinder and 2 ) Focused the subject by pressing and holding the shutter button half way down, you now have to 3) Re-frame the image. With the shutter button still held down, move the camera in any direction and in the case above - to the left - and 4) Shoot - press the shutter button all the way down. Finished!
For subjects that you have difficulty focusing, especially ones that move, you can set your camera's focus point to Auto. Setting the AF mode to AI SERVO can also help. An explanation of AI Servo can be found here.
It's time to take your own pictures. Remember the concepts discussed in Lesson 1. Experiment with your camera and use it all the time and you'll figure everything out in no time.
Saturday, April 3, 2010
Spotting Feikos - Fake Seiko Watches
Here are a bunch of pictures I collected on ebay back when I was still roaming that site for good deals.
Telltale signs of a Feiko in disguise:
Electra Models


Font styles, sizes & wording


Ugly
A bit trickier to spot because the font looks fine, but the style is just plain ugly. Seiko makes some ugly models, but these just look cheap.


Diamonds
Seen on a lot of 'Electra' models


Etched Glass
A bit trickier to spot. The sign is normally just above the 6 and towards the center.


Telltale signs of a Feiko in disguise:
- 'Electra' on the dial
- Ridiculous numbers and adjectives i.e. 'Unbreakable'
- Diamonds
- Font sizes and styles
- Signs etched into the glass
Electra Models


Font styles, sizes & wording
- The 'Seiko' font is just not right


- Sometimes will see words like 'Swiss Made', 'Incabloc' or crazy water resistant depth numbers
- Words look like they're painted on


Ugly
A bit trickier to spot because the font looks fine, but the style is just plain ugly. Seiko makes some ugly models, but these just look cheap.


Diamonds
Seen on a lot of 'Electra' models


A bit trickier to spot. The sign is normally just above the 6 and towards the center.


- Just need experience to notice this one. It just doesn't look right.

Subscribe to:
Posts (Atom)


